Picture combinators and recursive fish
Posted: July 22, 2017 Filed under: Uncategorized 2 CommentsOn February 9th 2017, I was sitting in an auditorium in Krakow, listening to Mary Sheeran and John Hughes give the opening keynote at the Lambda Days conference. It was an inspired and inspiring keynote, that discussed some of the most influential ideas in some of the most interesting papers written on functional programming. You should absolutely check it out.
One of the papers that was mentioned was Functional Geometry by Peter Henderson, written in 1982. In it, Henderson shows a deconstruction of an Escher woodcut called Square Limit, and how he can elegantly reconstruct a replica of the woodcut by using functions as data. He defines a small set of picture combinators – simple functions that operate on picture functions – to form complex pictures out of simple ones.
Escher’s original woodcut looks like this:
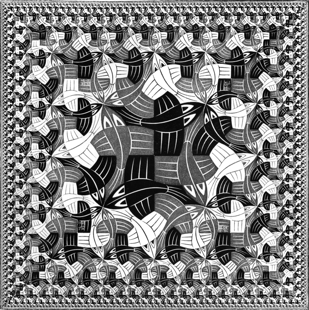
Which is pretty much a recursive dream. No wonder Henderson found it so fascinating – any functional programmer would.
As I was listening the keynote, I recalled that I had heard about the paper before, in the legendary SICP lectures by Abelson and Sussman (in lecture 3A, in case you’re interested). I figured it was about time I read the paper first hand. And so I did. Or rather, I read the revised version from 2002, because that’s what I found online.
And of course one thing led to another, and pretty soon I had implemented my own version in F#. Which is sort of why we’re here. Feel free to tag along as I walk through how I implemented it.
A key point in the paper is to distinguish between the capability of rendering some shape within a bounding box onto a screen on the one hand, and the transformation and composition of pictures into more complex pictures on the other. This is, as it were, the essence of decoupling through abstraction.
Our basic building block will be a picture. We will not think of a picture as a collection of colored pixels, but rather as something that is capable of scaling and fitting itself with respect to a bounding box. In other words, we have this:
type Picture : Box -> Shape list
A picture is a function that takes a box and creates a list of shapes for rendering.
What about the box itself? We define it using three vectors a, b and c.
type Vector = { x : float; y : float }
type Box = { a : Vector; b : Vector; c : Vector}
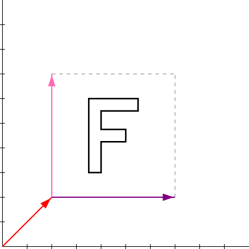
The vector a denotes the offset from the origin to the bottom left corner of the box. The vectors b and c span out the bounding box itself. Each vector is defined by its magnitude in the x and y dimensions.
For example, assume we have a picture F that will produce the letter F when given a bounding box. A rendering might look like this:
But if we give F a different box, the rendering will look different too:
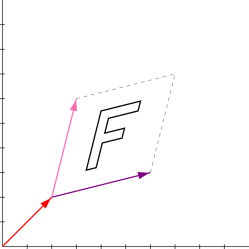
So, how do we create and render such a magical, self-fitting picture?
We can decompose the problem into three parts: defining the basic shape, transforming the shape with respect to the bounding box, and rendering the final shape.
We start by defining a basic shape relative to the unit square. The unit square has sides of length 1, and we position it such that the bottom left corner is at (0, 0) and top right corner is at (1, 1). Here’s a definition that puts a polygon outlining the F picture inside the unit square:
let fShape =
  let pts = [
    { x = 0.30; y = 0.20 }
    { x = 0.40; y = 0.20 }
    { x = 0.40; y = 0.45 }
    { x = 0.60; y = 0.45 }
    { x = 0.60; y = 0.55 }
    { x = 0.40; y = 0.55 }
    { x = 0.40; y = 0.70 }
    { x = 0.70; y = 0.70 }
    { x = 0.70; y = 0.80 }
    { x = 0.30; y = 0.80 } ]
  Polygon { points = pts }
To make this basic shape fit the bounding box, we need a mapping function. That’s easy enough to obtain:
let mapper { a = a; b = b; c = c } { x = x; y = y } =
   a + b * x + c * y
The mapper function takes a bounding box and a vector, and produces a new vector adjusted to fit the box. We’ll use partial application to create a suitable map function for a particular box.
As you can see, we’re doing a little bit of vector arithmetic to produce the new vector. We’re adding three vectors: a, the vector obtained by scaling b by x, and the vector obtained by scaling c by y. As we proceed, we’ll need some additional operations as well. We implement them by overloading some operators for the Vector type:
static member (+) ({ x = x1; y = y1 }, { x = x2; y = y2 }) =
    { x = x1 + x2; y = y1 + y2 }

static member (~-) ({ x = x; y = y }) =
    { x = -x; y = -y }

static member (-) (v1, v2) = v1 + (-v2)

static member (*) (f, { x = x; y = y }) =
    { x = f * x; y = f * y }

static member (*) (v, f) = f * v

static member (/) (v, f) = v * (1 / f)
This gives us addition, negation, subtraction, scalar multiplication and scalar division for vectors.
Finally we need to render the shape in some way. It is largely an implementation detail, but we’ll take a look at one possible simplified rendering. The code below can be used to produce an SVG image of polygon shapes using the NGraphics library.
type PolygonShape = { points : Vector list }

type Shape = Polygon of PolygonShape

let mapShape m = function
  | Polygon { points = pts } ->
    Polygon { points = pts |> List.map m }

let createPicture shapes =
   fun box ->
     shapes |> List.map (mapShape (mapper box))

let renderSvg width height filename shapes =
  let size = Size(width, height)
  let canvas = GraphicCanvas(size)
  let p x y = Point(x, height - y)
  let drawShape = function
  | Polygon { points = pts } ->
    match pts |> List.map (fun { x = x; y = y } -> p x y) with
    | startPoint :: t ->
      let move = MoveTo(startPoint) :> PathOp
      let lines = t |> List.map (fun pt -> LineTo(pt) :> PathOp)
      let close = ClosePath() :> PathOp
      let ops = (move :: lines) @ [ close ]
      canvas.DrawPath(ops, Pens.Black)
    | _ -> ()
  shapes |> List.iter drawShape
  use writer = new StreamWriter(filename)
  canvas.Graphic.WriteSvg(writer)
When we create the picture, we use the mapShape function to apply our mapping function to all the points in the polygon that makes up the F. The renderSvg is used to do the actual rendering of the shapes produced by the picture function.
Once we have the picture abstraction in place, we can proceed to define combinators that transform or compose pictures. The neat thing is that we can define these combinators without having to worry about the rendering of shapes. In other words, we never have to pry open our abstraction, we will trust it to do the right thing. All our work will be relative, with respect to the bounding boxes.
We start with some basic one-to-one transformations, that is, functions with this type:
type Transformation = Picture -> Picture
The first transformation is turn, which rotates a picture 90 degrees counter-clockwise around its center (that is, around the center of its bounding box).
The effect of turn looks like this:
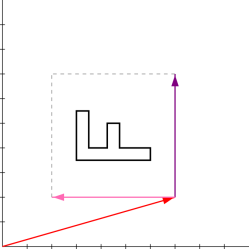
Note that turning four times produces the original picture. We can formulate this as a property:
(turn >> turn >> turn >> turn) p = p
(Of course, for pictures with symmetries, turning twice or even once might be enough to yield a picture equal to the original. But the property above should hold for all pictures.)
The vector arithmetic to turn the bounding box 90 degrees counter-clockwise is as follows:
(a’, b’, c’) = (a + b, c, -b)
And to reiterate: the neat thing is that this is all we need to consider. We define the transformation using nothing but this simple arithmetic. We trust the picture itself to cope with everything else.
In code, we write this:
let turnBox { a = a; b = b; c = c } =
    { a = a + b; b = c; c = -b }

let turn p = turnBox >> p
The overloaded operators we defined above makes it very easy to translate the vector arithmetic into code. It also makes the code very easy to read, and hopefully convince yourself that it does the right thing.
The next transformation is flip, which flips a picture about the center vertical axis of the bounding box.
Which might sound a bit involved, but it’s just this:
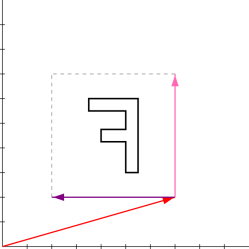
Flipping twice always produces the same picture, so the following property should hold:
(flip >> flip) p = p
The vector arithmetic is as follows:
(a’, b’, c’) = (a + b, -b, c)
Which translates neatly to:
let flipBox { a = a; b = b; c = c } =
   { a = a + b; b = -b; c = c }

let flip p = flipBox >> p
The third transformation is a bit peculiar, and quite particular to the task of mimicking Escher’s Square Limit, which is what we’re building up to. Henderson called the transformation rot45, but I’ll refer to it as toss, since I think it resembles light-heartedly tossing the picture up in the air:
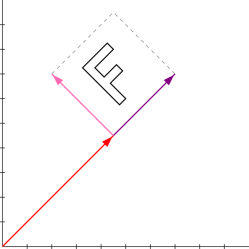
What’s going on here? Its a 45 degree counter-clockwise rotation around top left corner, which also shrinks the bounding box by a factor of √2.
It’s not so easy to define simple properties that should hold for toss. For instance, tossing twice is not the same as turning once. So we won’t even try.
The vector arithmetic is still pretty simple:
(a’, b’, c’) = (a + (b + c) / 2, (b + c) / 2, (c − b) / 2)
And it still translates very directly into code:
let tossBox { a = a; b = b; c = c } =
  let a' = a + (b + c) / 2
  let b' = (b + c) / 2
  let c' = (c − b) / 2
  { a = a'; b = b'; c = c' }

let toss p = tossBox >> p
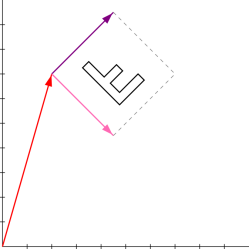
That’s all the transformations we’ll use. We can of course combine transformations, e.g:
(turn >> turn >> flip >> toss)
Which produces this:
We proceed to compose simple pictures into more complex ones. We define two basic functions for composing pictures, above and beside. The two are quite similar. Both functions take two pictures as arguments; above places the first picture above the second, whereas beside places the first picture to the left of the second.
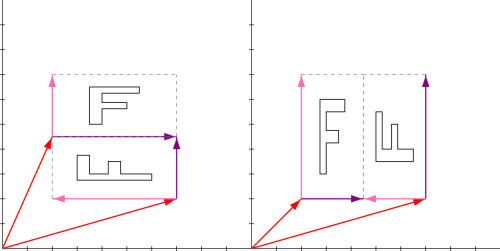
Here we see the F placed above the turned F, and the F placed beside the turned F. Notice that each composed picture forms a square, whereas each original picture is placed within a half of that square. What happens is that the bounding box given to the composite picture is split in two, with each original picture receiving one of the split boxes as their bounding box. The example shows an even split, but in general we can assign a fraction of the bounding box to the first argument picture, and the remainder to the second.
For implementation details, we’ll just look at above:
let splitHorizontally f box =
  let top = box |> moveVertically (1. - f) |> scaleVertically f
  let bottom = box |> scaleVertically (1. - f)
  (top, bottom)

let aboveRatio m n p1 p2 =
  fun box ->
    let f = float m / float (m + n)
    let b1, b2 = splitHorizontally f box
    p1 b1 @ p2 b2

let above = aboveRatio 1 1
There are three things we need to do: work out the fraction of the bounding box assigned to the first picture, split the bounding box in two according to that fraction, and pass the appropriate bounding box to each picture. We “split” the bounding box by creating two new bounding boxes, scaled and moved as appropriate. The mechanics of scaling and moving is implemented as follows:
let scaleVertically s { a = a; b = b; c = c } =
  { a = a
    b = b
    c = c * s }

let moveVertically offset { a = a; b = b; c = c } =
  { a = a + c * offset
    b = b
    c = c }
Now we can create more interesting images, such as this one:
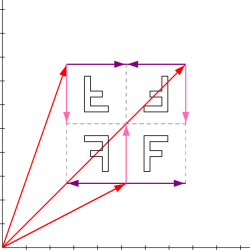
Which is made like this:
above (beside (turn (turn (flip p))) (turn (turn p)))
      (beside (flip p) p)
With this, our basic toolset is complete. Now it is time to lose the support wheels and turn our attention to the original task: creating a replica of Henderson’s replica of Escher’s Square Limit!
We start with a basic picture that is somewhat more interesting than the F we have been using so far.
According to the paper, Henderson created his fish from 30 bezier curves. Here is my attempt at recreating it:
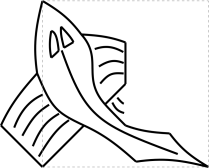
You’ll notice that the fish violates the boundaries of the unit square. That is, some points on the shape has coordinates that are below zero or above one. This is fine, the picture isn’t really bound by its box, it’s just scaled and positioned relative to it.
We can of course turn, flip and toss the fish as we like.

But there’s more to the fish than might be immediately obvious. After all, it’s not just any fish, it’s an Escher fish. An interesting property of the fish is shown if we overlay it with itself turned twice.
We define a combinator over that takes two pictures and places both pictures with respect to the same bounding box. And voila:
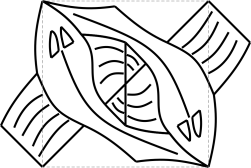
As we can see, the fish is designed so that it fits together neatly with itself. And it doesn’t stop there.
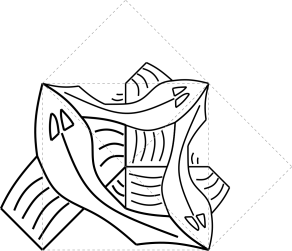
This shows the tile t, which is one of the building blocks we’ll use to construct Square Limit. The function ttile creates a t tile when given a picture:
let ttile f =
   let fishN = f |> toss |> flip
   let fishE = fishN |> turn |> turn |> turn
   over f (over fishN fishE)
Here we see why we needed the toss transformation defined earlier, and begin to appreciate the ingenious design of the fish.
The second building block we’ll need is called tile u. It looks like this:
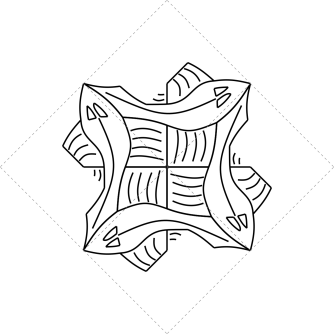
And we construct it like this:
let utile (f : Picture) =
  let fishN = f |> toss |> flip
  let fishW = fishN |> turn
  let fishS = fishW |> turn
  let fishE = fishS |> turn
  over (over fishN fishW)
       (over fishE fishS)
To compose the Square Limit itself, we observe that we can construct it from nine tiles organized in a 3×3 grid. We define a helper function nonet that takes nine pictures as arguments and lays them out top to bottom, left to right. Calling nonet with pictures of the letters H, E, N, D, E, R, S, O, N produces this result:
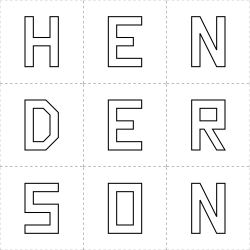
The code for nonet looks like this:
let nonet p q r s t u v w x =
  aboveRatio 1 2 (besideRatio 1 2 p (beside q r))
                 (above (besideRatio 1 2 s (beside t u))
                        (besideRatio 1 2 v (beside w x)))
Now we just need to figure out the appropriate pictures to pass to nonet to produce the Square Limit replica.
The center tile is the easiest: it is simply the tile u that we have already constructed. In addition, we’ll need a side tile and a corner tile. Each of those will be used four times, with the turn transformation applied 0 to 3 times.
Both side and corner have a self-similar, recursive nature. We can think of both tiles as consisting of nested 2×2 grids. Similarly to nonet, we define a function quartet to construct such grids out of four pictures:
let quartet p q r s = above (beside p q) (beside r s)
What should we use to fill our quartets? Well, first off, we need a base case to terminate the recursion. To help us do so, we’ll use a degenerate picture blank that produces nothing when given a bounding box.
We’ll discuss side first since it is the simplest of the two, and also because corner uses side. The base case should look like this:
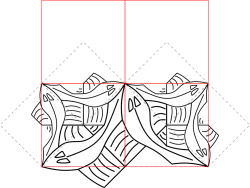
For the recursive case, we’ll want self-similar copies of the side-tile in the top row instead of blank pictures. So the case one step removed from the base case should look like this:
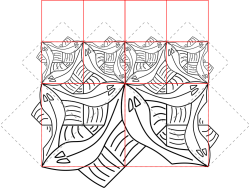
The following code helps us construct sides of arbitrary depth:
let rec side n p =
  let s = if n = 1 then blank else side (n - 1) p
  let t = ttile p
  quartet s s (t |> turn) t
This gives us the side tile that should be used as the “north” tile in the nonet function. We obtain “west”, “south” and “east” as well by turning it around once, twice or thrice.
Creating a corner is quite similar to creating a side. The base case should be a quartet consisting of three blank pictures, and a u tile for the final, bottom right picture. It should look like this:

The recursive case should use self-similar copies of both the corner tile (for the top left or “north-west” picture) and the side tile (for the top right and bottom left pictures), while keeping the u tile for the bottom right tile.
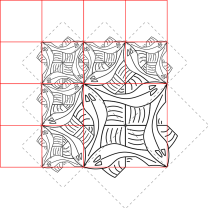
Here’s how we can write it in code:
let rec corner n p =
  let c, s = if n = 1 then blank, blank
             else corner (n - 1) p, side (n - 1) p
  let u = utile p
  quartet c s (s |> turn) u
This gives us the top left corner for our nonet function, and of course we can produce the remaining corners by turning it a number of times.
Putting everything together, we have:
let squareLimit n picture =
  let cornerNW = corner n picture
  let cornerSW = turn cornerNW
  let cornerSE = turn cornerSW
  let cornerNE = turn cornerSE
  let sideN = side n picture
  let sideW = turn sideN
  let sideS = turn sideW
  let sideE = turn sideS
  let center = utile picture
  nonet cornerNW sideN cornerNE
        sideW center sideE
        cornerSW sideS cornerSE
Calling squareLimit 3 fish produces the following image:
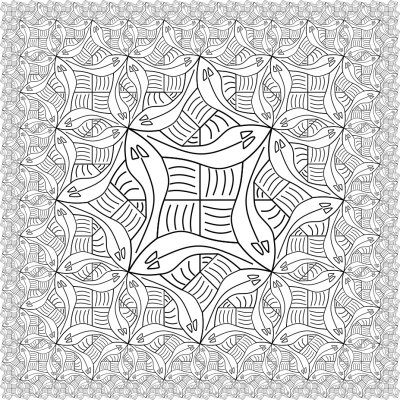
Which is a pretty good replica of Henderson’s replica of Escher’s Square Limit, to a depth of 3. Sweet!
Misson accomplished? Are we done?
Sort of, I suppose. I mean, we could be.
However, if you take a look directly at Escher’s woodcut (or, more likely, the photos of it that you can find online), you’ll notice a couple of things. 1) Henderson’s basic fish looks a bit different from Escher’s basic fish. 2) Escher’s basic fish comes in three hues: white, grey and black, whereas Henderson just has a white one. So it would be nice to address those issues.
Here’s what I came up with.

To support different hues of the same fish requires a bit of thinking – we can’t just follow Henderson’s instructions any more. But we can use exactly the same approach! In addition to transforming the shape of the picture, we need to be able to transform the coloring of the picture. For this, we introduce a new abstraction, that we will call a Lens.
type Hue = Blackish | Greyish | Whiteish

type Lens = Box * Hue
We redefine a picture to accept a lens instead of just a box. That way, the picture can take the hue (that is, the coloring) into account when figuring out what to draw. Now we can define a new combinator rehue that changes the hue given to a picture:
let rehue p =
  let change = function
  | Blackish -> Greyish
  | Greyish -> Whiteish
  | Whiteish -> Blackish
  fun (box, hue) -> p (box, change hue)
Changing hue three times takes us back to the original hue:
(rehue >> rehue >> rehue) p = p
We need to revise the tiles we used to construct the Square Limit to incorporate the rehue combinator. It turns out we need to create two variants of the t tile.
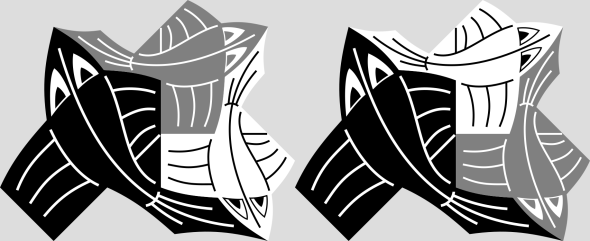
But of course it’s just the same old t tile with appropriate calls to rehue for each fish:
let ttile hueN hueE f =
   let fishN = f |> toss |> flip
   let fishE = fishN |> turn |> turn |> turn
   over f (over (fishN |> hueN)
                (fishE |> hueE))

let ttile1 = ttile rehue (rehue >> rehue)

let ttile2 = ttile (rehue >> rehue) rehue
For the u tile, we need three variants:

Again, we just call rehue to varying degrees for each fish.
let utile hueN hueW hueS hueE f =
  let fishN = f |> toss |> flip
  let fishW = fishN |> turn
  let fishS = fishW |> turn
  let fishE = fishS |> turn
  over (over (fishN |> hueN) (fishW |> hueW))
       (over (fishE |> hueE) (fishS |> hueS))

let utile1 =
  utile (rehue >> rehue) id (rehue >> rehue) id

let utile2 =
  utile id (rehue >> rehue) rehue (rehue >> rehue)

let utile3 =
  utile (rehue >> rehue) id rehue id
We use the two variants of the t tile in two side functions, one for the “north” and “south” side, another for the “west” and “east” side.
let side tt hueSW hueSE n p =
  let rec aux n p =
    let t = tt p
    let r = if n = 1 then blank else aux (n - 1) p
    quartet r r (t |> turn |> hueSW) (t |> hueSE)
  aux n p

let side1 =
  side ttile1 id rehue

let side2 =
  side ttile2 (rehue >> rehue) rehue
We define two corner functions as well, one for the “north-west” and “south-east” corner, another for the “north-east” and the “south-west” corner.
let corner ut sideNE sideSW n p =
  let rec aux n p =
    let c, ne, sw =
      if n = 1 then blank, blank, blank
               else aux (n - 1) p, sideNE (n - 1) p, sideSW (n - 1) p
    let u = ut p
    quartet c ne (sw |> turn) u
  aux n p

let corner1 =
  corner utile3 side1 side2

let corner2 =
  corner utile2 side2 side1
Now we can write an updated squareLimit that uses our new tile functions.
let squareLimit n picture =
  let cornerNW = corner1 n picture
  let cornerSW = corner2 n picture |> turn
  let cornerSE = cornerNW |> turn |> turn
  let cornerNE = cornerSW |> turn |> turn
  let sideN = side1 n picture
  let sideW = side2 n picture |> turn
  let sideS = sideN |> turn |> turn
  let sideE = sideW |> turn |> turn
  let center = utile1 picture
  nonet cornerNW sideN cornerNE
        sideW center sideE
        cornerSW sideS cornerSE
And now calling squareLimit 5 fish produces the following image:
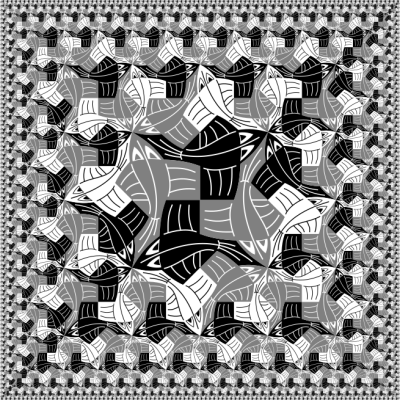
Which is a pretty good replica of Escher’s Square Limit, to a depth of 5.
The complete code is here.
Update: I have also written a version using Fable and SAFE that I use for presentations. You can find it here.
Excellent article and references – The vector approach makes things very clear and clean.
– one note, maybe default the code in the repo to set debug=false in Svg.fs – I wasn’t sure what was wrong when I built and ran straight from the repo.
Thanks! I’ve been working on some other shapes than the fish, but I’ll keep the master branch debug-free and more stable going forward.